
Administration: Settings
Welcome to Administration Settings in Outbound by Enreach.
If you are an Administrator, here you can edit settings related to Outbound by Enreach.
Read through the article, or click a link below to get started.
In this article:
- Email SMTP Settings
- Password Strength Settings
- System Pause
- Contact Page Customisation
- Contact Page Hot Keys
- Campaign Page Hot Keys
- Report Settings
- Redial Restrictions
- Common
- Dialing Settings
To access the Settings, expand the Administration drop-down menu and select Settings.

Email SMTP Settings
Under Email SMTP Settings, you can configure a custom SMTP server, or connect SendGrid via an API key:
- Provider: Choose your own Email provider from the drop-down menu. SendGrid is the default for all new accounts, but you can choose a custom provider.
- API Key: Copy the API key, or click the eye icon to view it.
If you have chosen Provider > Custom like in the image below, you will see different options. Gather this information from your own SMTP provider and enter it below:
- SMTP Server
- Port
- Use Secure Communication (SSL)
- User Name
- Password
Using your Gmail account to send emails? You'll need an App Password from Google. Head to this guide to find out how to do this.
Under Testing you can send a test email to ensure the SMTP settings are correct:
- Email From: The Email address that will be shown in the from field.
- Email To: The Email address that the test email will be sent to.
Click Check to test the SMTP settings by sending a test email.

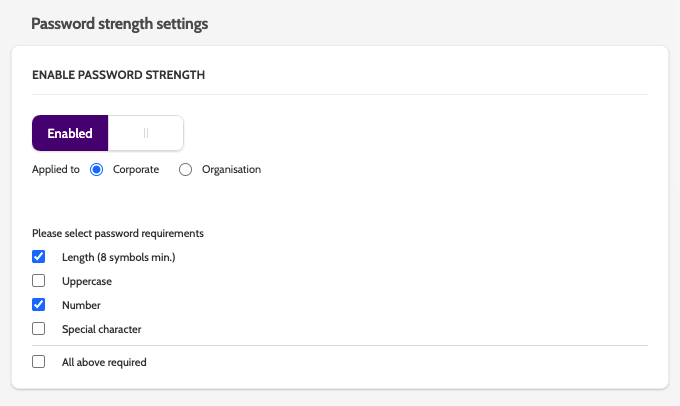
Password Strength Settings
Under Password Strength Settings, configure how strong passwords for Outbound by Enreach need to be:
- Toggle between Enabled and Disabled to enable password settings.
- Click Corporate to apply the settings to all Users in all Teams, or Organisation to apply the settings to different Teams in your Organisation.
Check the boxes of all of the desired password requirements.
Please note that Password Strength Settings only apply to new passwords. However, if a User with an old password clicks 'Forgot my Password,' then the new password will be created according to the settings applied here.
System Pause
Under Enabling Pause for an Agent, you can allow an Agent to pause a session in Outbound by Enreach, choosing a number of default reasons, or creating custom reasons in Administration Pauses:
- Toggle between Enabled and Disabled to enable System Pause.
- If enabled, click Corporate, Organisation, or User to choose which parts of your Organisation will be able to use System Pause.
Detailed Pause statistics can be viewed in Time Usage.
Under Timeusage Timeslot Size, configure the size in minutes that each System Pause timeslot will be:
- Toggle between Enabled and Disabled to enable Timeusage Timeslot Size.
- If enabled, click Corporate, Organisation, or User to choose which parts of your Organisation will be able to use System Pause.
- Use the arrows to adjust the Timeslot size in minutes.

Contact Page Customisation
Under Color Theme, you can allow different parts of your Organisation to customise the Contact Page theme:
- Toggle between Enabled and Disabled to enable customisation.
- If enabled, click Corporate, Organisation, or User to choose which parts of your Organisation will be able to customise the Contact Page.
- Next, choose between Original, Greyscale, and Cobalt theme for the default colour theme.
Under Page Layout Edit Mode, you can allow different parts of your Organisation to change the layout of the Contact Page:
- Toggle between Enabled and Disabled to enable layout customisation.
- If enabled, click Corporate, Organisation, or User to choose which parts of your Organisation will be able to customise the Contact Page layout.
- Next, toggle between Standard and Reversed to set the default view.
Standard will display the Lead Master Data on the left side of the screen, and Reversed will display it on the right side. Result Master Data will always be displayed in the center of the screen.
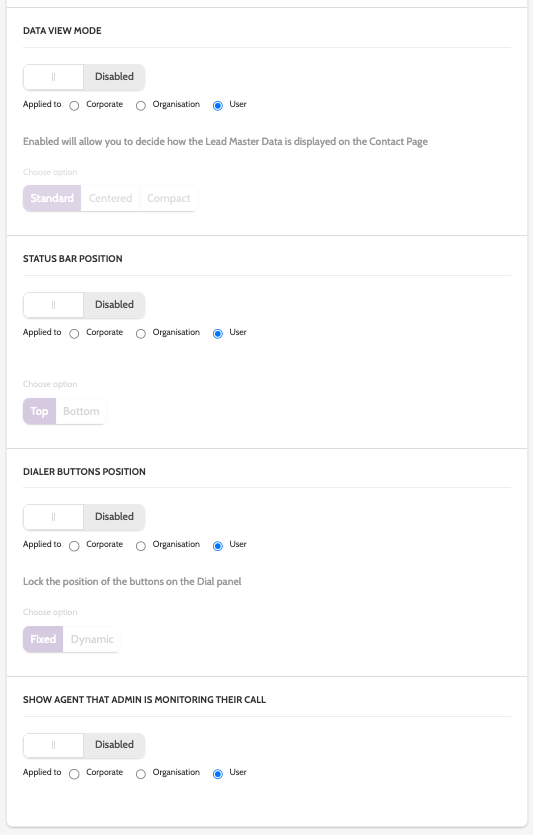
 Under Data View Mode, you can allow different parts of your Organisation to change the layout of the Lead Master Data:
- Toggle between Enabled and Disabled to enable customisation
- If enabled, click Corporate, Organisation, or User to choose which parts of your Organisation will be able to change the layout
- Next, toggle between Standard, Centered, and Compact to set the default placement for the Lead Master Data.
Standard will display the Lead Master Data in the full width of the section, with Data Fields in a list view.
Centered will display it in the middle, and Compact with display the Data Fields in two columns, removing the need for scrolling - If the User has the correct Permissions, these can be configured on the Contact Page settings.
Under Status Bar Position, you can allow different parts of your Organisation to change the placement of the Status Bar in the Dialer:
- Toggle between Enabled and Disabled to enable customisation
- If enabled, click Corporate, Organisation, or User to choose which parts of your Organisation will be able to change the layout
- Next, toggle between Top and Bottom to set the default placement of the Status Bar.
Under Dialer Buttons Position, you can allow different parts of your Organisation to change the position of the Contact Page Dialer Buttons:
- Toggle between Enabled and Disabled to enable customisation
- If enabled, click Corporate, Organisation, or User to choose which parts of your Organisation will be able to change the button position
- If you have chosen to enable the customisation, toggle between Fixed and Dynamic to set the default button position.
Fixed will display the Dialer buttons in the same position all the time, while Dynamic will change depending on the relevant actions needed.
Under Show Agent that Admin is Monitoring their Call, you can disable the notification an Agent will receive when a Team Leader or Administrator is monitor their call through the Live Operations page.
- Toggle between Enabled and Disabled to enable notifications
- If enabled, click Corporate, Organisation, or User to choose which parts of your Organisation will be able to change the button position.
Contact Page Hot Keys
Under Hot Keys Enabling and Managing, you can configure a number of keyboard shortcuts for frequently used actions:
- Toggle between Enabled and Disabled to enable the use and management of Contact Page Hot Keys.
- If enabled, click Corporate, Organisation, or User to choose which parts of your Organisation will be able to use the Hot Keys.
- Next, set the shortcut combination for each Hot Key in the appropriate fields. Each combination must be unique for the Hot Key to work.
Please note that Hot Keys in Outbound by Enreach cannot be the same combination as those configured in your chosen browser.
Consult the user guides for your browser to make sure you don't duplicate any Hot Keys.

Campaign Page Hot Keys
Under Enable Using Campaign Page Hot Keys, you can configure a number of keyboard shortcuts for frequently used actions on the Campaign Page:
- Toggle between Enabled and Disabled to enable use and management of Campaign Page Hot Keys.
- If enabled, click Corporate, Organisation, or User to choose which parts of your Organisation will be able to use the Hot Keys.
- Next, set the shortcut combination for each Hot Key in the appropriate fields. Each combination must be unique for the Hot Key to work.
Please note that Hot Keys in Outbound by Enreach cannot be the same combination as those configured in your chosen browser.
Consult the user guides for your browser to make sure you don't duplicate any Hot Keys.

Report Settings
Under Enable Total Time Multiplier, you can multiple the time entered in the Report Admin KPI columns to account for Agent activity spent away from from the Contact Page:
- Toggle between Enabled and Disabled to enable the total time multiplier.
- If enabled, click Corporate, Organisation, or User to apply which parts of your Organisation will be able to use Total Time Multiplier.
- Next, set the Total Time multiplier. For example, if you estimate that Users in your Organisation spend 20% of their work day outside of the Contact Page, set the Total Time Multiplier by 1.2 to account for a standard 8 hour work day.

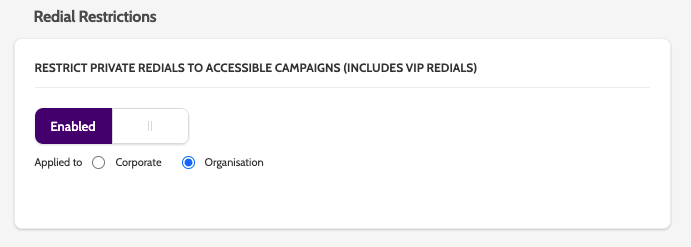
Redial Restrictions
Under Redial Restrictions, you can restrict an Agent's access to Private and VIP Redials if their Campaign access has been revoked. This will ensure that Teams will only be able to call Leads in the Campaigns they have access to:
- Toggle between Enabled and Disabled to enable Redial restrictions.
Enabled will allow Agents to only access VIP and Private Redials in Campaigns that they have access to. - If enabled, click Corporate, Organisation, or User to choose which parts of your Organisation will have Redial Restrictions.
Please note that VIP Redials will still be tied to the Agent that set them, but will not appear in the Dialer when Redial Restrictions are enabled.
Common
Under Inbound Connection Mode, allow for Inbound calls if you have the Inbound module:
- Toggle between Enabled and Disabled to enable Inbound Connection Mode.
- If enabled, click Corporate, Organisation, or User to choose which parts of your Organisation will be able to access Inbound Connection Mode.
- If enabled, choose between connecting Immediately, Click connect, list view, and Click connect small info.
Click connect, list view will allow Agents to select from a list of multiple incoming calls.
Click connect, small info will allow Agents to view Lead information before connecting to the call.

Dialing Settings
Under Alternate Unprocessed Leads and Redials, you can enable the Dialer to pick between unprocessed Leads and Redials, which changes the statistical chance of connecting to a Lead:
- Toggle between Enabled and Disabled to enable the option to alternate unprocessed Leads and Redials.
- If enabled, Corporate is the default setting for alternating calls.
 When you have finished, click Save to save any new Administration settings, or Cancel to exit without saving.
