
Campaigns: Campaign Template
Welcome to Campaign Templates in Outbound by Enreach.
Campaign Templates are the base for all your Campaigns in Outbound by Enreach. View, Create, and Edit Campaign Templates, all in one place.
To read this guide in Danish, click here.
Read through the article, or click a link below to get started.
In this article:
- What is a Campaign Template?
- Navigation Page
- Create Campaign Template
- Campaign Settings
- Edit Campaign Template
- Rename Campaign Template
What is a Campaign Template?
Before we begin, let's get familiar with some essential terms in Outbound by Enreach:
- Campaign: This is what you and your Agents will be working in, calling Leads and gathering all the relevant information. Campaigns are client specific, and cannot be reused.
- Project: A Project is a container for Campaigns in Outbound by Enreach. Projects are client specific, and will contain all of the Campaigns related to that client.
- Campaign Template: The Campaign Template is the design of a Campaign: a handy, reusable model for determining what kind of Lead Data you will upload to the Campaign, and what Result Data to collect when calling Leads.
As you can see in the image below, when Campaigns are created they will belong to a Project, but different Campaigns can be based on the same Campaign Template.

Do I need a Campaign Template?
Creating a Campaign Template in Outbound by Enreach means that you can easily create several different campaigns that are very similar.
Typically, your customers will have several different Campaigns over time - for example, a charity may run seasonal fundraising campaigns depending on the time of the year. The Spring and the Autumn Campaigns are almost the same, but the E-mail Template and the Manuscript will be slightly different.
To save time and maintain consistency, the Campaign Template for the Spring Campaign can be cloned, and the E-mail Template and Manuscript can be quickly edited to suit the Autumn Campaign.
Campaign Templates can be cloned and reused as many times as needed, regardless of the Project or the client, making it simple to create new Campaigns for new clients.
Even if there are some differences between Campaigns and the type of Data you need to collect, you can still use the Campaign Template, but modify the Data Fields in a Campaign Template View - read how to do this here.
Navigation Page
To access the Campaign Templates navigation page, expand the Campaigns drop-down menu and select Campaign Templates.

You will see an overview of all your existing Campaign Templates, including the Name, Created date, and Last Modified date.
Use the Search bar to search for a specific Campaign Template.

Scroll through all of your Campaign Templates using the arrows at the bottom of the page.

To delete a Campaign Template, check the box and click Delete.

Create Campaign Template
To begin creating your Campaign Template, expand the Campaigns drop-down menu and select Campaign Templates.

Click +New in the right side of the screen.

Define Campaign Template
In step 1, begin by entering a name for your Campaign Template. This is internal only.
Expand the Base Campaign Template on drop-down menu. Select Existing Campaign Template to base your new template on an existing one, or to begin a new on from scratch.
To begin a new one, choose Blank under section 2a., then click Next.

If you have a CSV file containing the Leads you want to upload, and the Lead columns, then choose your file and click Next.
Your CSV file will contain all the Leads you want to upload. Each column header will be identical to the names of the Master Data Fields.

Master Data Fields
Depending on whether you have uploaded a CSV, or are working with an existing or new template, in the next step you will see the Edit Template page. This is where you will configure all the Lead Data of your Campaign Template.

You will now need to match each Master Data Field with a suitable Data Type. By default, Outbound by Enreach will select Text (Small Field) as the Data Type .
How to Edit the Master Data Fields


Result Data Fields
Once you have configured all of your Master Data Fields, it's time to configure your Result Data Fields.
New Result Data Fields can be added by clicking the green New button.

In Outbound by Enreach, the outcome of calls to your Leads are known as Results.
These will differ depending on what type of Campaign you are running. You can have several Results, but it is mandatory to have a Main Outcome Data Type, which is the basic "Yes, please," or Success, or "No, thanks" or Not Interested option.
There are several essential Result Data Fields: click a link below to jump directly to the guide, or continue scrolling.
Main Outcome
Let's begin with the Main Outcome, which is aways a drop-down menu, or Picklist.
This will be the question that Agents ask the Lead which will determine if the call was a success or not.
Click the pencil icon on the Result Data Field you wish to edit.

Under Data Options, expand the Data Type drop-down menu and select Main Outcome.

Under Select Options, enter the Main Outcomes in the Name and the Value in the text boxes.
The Name is the Lead response recorded by the Agent, and the Value is the result of that response.
To save the Main Outcome, click the green arrow, and repeat as many times as necessary.
To delete a Main Outcome, select and click the red stop icon.

Number
A Result Data Field with a Number Data Type will allow the Agent to manually enter a number in response to a question they ask the Lead.
To create a Result Data Field that will be answered with a number, expand the Data Type drop-down menu and select Number (*).

Picklist
A Result Data Field with a Picklist Data Type will allow the Agent to manually select a response from a selection of predefined answers.
Picklists are similar to drop-down menus, and are configured exactly the same way as your Main Outcome.
Under Select Options, enter the options in the Name and the Value in the text boxes.
The Name is the Lead response recorded by the Agent, and the Value is the result of that response.
To save the Main Outcome, click the green arrow, and repeat as many times as necessary.
To delete a Main Outcome, select and click the red stop icon.

Checkbox
A Result Data Field with a Checkbox Data Type will allow the Agent to manually check a box to confirm a positive response to a Yes/No question they ask the Lead.
To create a Result Data Field that will be answered with a Yes/No, expand the Data Type drop-down menu and select Checkbox.

Formula & Entry
An Entry Data Field will allow you to create a pre-filled, static Data Field in your Template, and is most commonly used to include clickable URLs on the Contact Page, or to a Lead’s entry in your organisations CRM by using Merge fields.
A Formula Data Field will allow you to make calculations based on previous, existing Data Fields.
For example, in the image below, the Total Commission for an Agent is calculated based on the Lead's answer to 'Donate?'
To learn how to create an Entry and a Formula Data Field, head to this guide.

Advanced Options
There are a number of advanced options available when configuring your Result Data Fields:
- Entry Group Options
- Group Name: Here you can choose from existing Entry Groups, or click the plus (+) icon to create a new group name.
- Key in Group: Here you enter the Entry Group Key, which will correspond exactly with the correct column in your .xlsx file. Click here to learn how to create an Entry Group.
- Advanced Options
- Visible to Partners: Tick this box if you want the Result Data Field to be visible to partners via an API connection.
- Displaying the Field is Subject to User Permissions: Tick this box if only Users with the correct Permissions will be able to view this Field.
- Days before Data in this Field is Deleted: Enter a number of days the Result Field Data will be kept before being deleted.
- Success Archive Policy (1-5): Enter a value between 1 and 5 to use for Leads > Success Archive.
- Summary Fields: Click Summary Fields to open a list of fields that will pre-fill calendar appointments with data, when working in the Contact page. Please note that if you are using this option, you need to activate the same functions on the calendar you are using. This can be done by toggling the relevant Summary fields in the Calendar page.

Add a Calendar
Adding a Calendar to the Campaign Template will allow Agents to create calendar appointments from the Contact Page, directly into calendars that are connected to the Campaign.
Under Data type, select Booking entry id.
 The name of the Result Field will be the name on the Contact Page:

Lead Ownership Options and Validation
In part 3, you can decide how to deal with Leads that have been uploaded to the Campaign Template with an owner.
- Lead Ownership Code: Check this box if you are importing Leads with an owner. In the text box, enter the name of the column in the CSV file that contains the Lead owner.
- Lead Pool Priority: Check this box if you are importing Leads with a Lead Pool Priority. In the text box, enter the name of the column in the CSV file that contains the Lead Pool Priority.
- Private Redial Time: Check this box if you are importing Leads with a Private Redial Time. In the text box, enter the name of the column in the CSV file that contains the Private Redial Time.
To read more about Lead Ownership and how it can affect which Leads you have permission to dial, head here.

For example, if you want to upload Leads with a Lead owner, tick Lead ownership code and enter the code or title of the CSV column that will contain the Lead Owner.
In this example I have chosen Lead Owner as the code.
 When you upload your CSV to your Lead Pool, map the column to the Lead Owner data field.
 After uploading the files, you will see that your Leads have been uploaded with a Lead Owner.
Add this data as a column in Lead Admin with the Lead Admin (Code) column.

Before you continue, you will notice that all options are validated with a green tick, except Main Outcome has not been selected.
If any other options are not validated, go back and check your settings before continuing. Click Next to continue creating your Campaign Template.

Field Behaviour and Use
Once you have configured all of your Master Data and Result Fields, it's time to configure how Outbound by Enreach will use these Fields.
Select Main Result
Under Select Main Result, match the answers configured in the Main Outcome Picklist to the Outbound by Enreach selections by selecting the question from the drop-down menu.
In the Name column will be the outcomes you configured.
Define Lead results by matching the Name outcomes to one of the four Outbound by Enreach results ( Success, Not Interested, Invalid, Unqualified).

Select Fields
In Step 2 you will decide how the Master Data Fields and Result Data Fields will be used.
Master Data Fields is to the left, and Result Data Fields is to the right.
Check the following boxes if:
- Upload: The Field is required to have content when uploading Leads to the Campaign.
- Result: The Field is a required Result Field.
- Editable: The Agent is allowed to edit this Field.
- Duplicate search key: The Field should be used when looking for duplicate Leads.
- Visible: The Field should be visible on the Contact Page to the Agent.
- Lead ID: The Field Lead ID should be visible (unique across all Campaigns in the company).
In the image below, the Result Fields have been configured with Telephone as the Duplicate Search Key:
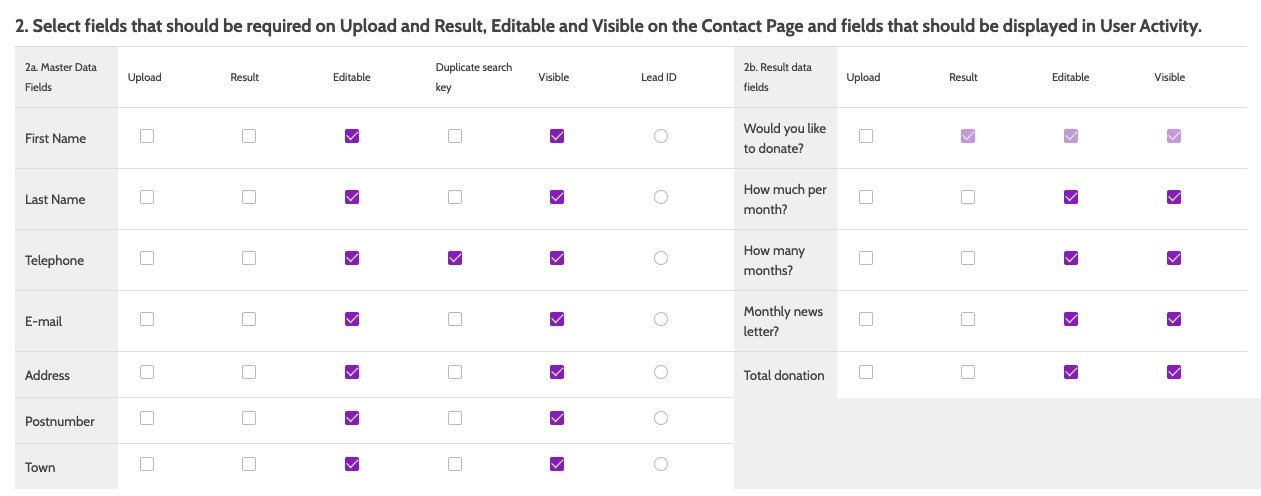
Please Note that at least one of your Master Data Fields should be a Duplicate Search Key, and the URL Master Data Field can’t be marked as Editable.
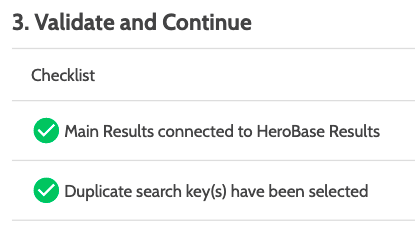
When you’re done, the validation checklist at the bottom should look like this:
Click Preview to preview how the Campaign Template will look for Agents when calling a Lead, and Previous to return to the last page in the editor.
Click Save to save your Campaign Template, and Next to continue to the next step.
Field Dependencies
Now your Campaign Template is ready, it's time to tell Outbound by Enreach what Fields to show depending on the information an Agent will receive from a Lead.
For example, in a charity Campaign Template, only after the Lead agrees to donate will the options for How much? and How often? become visible.
How to Configure the Field Dependencies
Under Field Dependencies, expand the drop-down menu and select which Master Data Field you want to work with, and click Add.

In Actions, check the box marked Make the field invisible until the dependency has the right value. This will ensure that How much? will only be visible when the Lead has responded Yes to Want to Donate?
In Only apply action if Want to Donate? has value, check the box marked Yes. This will ensure that when the Lead has responded that they would like to donate, and the Agent records the value Yes, only then will the Field How much? be visible to the Agent.

Repeat this for each Master Data Field whose visibility is dependent on your Main Outcome.
Click the Save icon to save your Field Dependency, and click Save at the bottom of the screen when done.

In the image below, all Master Data Fields that are only relevant if a Lead responds Yes to Want to Donate? have been hidden.
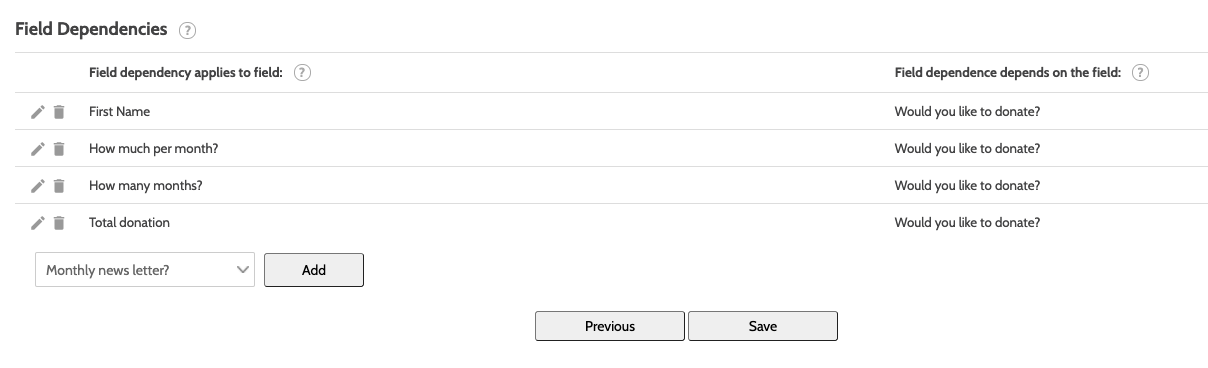
Click Save to save your Campaign Template, or Previous to go back to the editor.
Congratulations, you have completed your first Campaign Template in Outbound by Enreach!
Campaign Settings
When you are done you will be taken to the Edit Campaign page. You can configure these options now, or later.
To read more about each option, head over to this article.

Edit Campaign Template
To edit an existing Campaign Template, click the cog icon to the right of the template, and select Edit.

You will now be taken to the Edit Template page in Outbound by Enreach.
Master Data Fields and Result Entry Fields
Under parts 1 and 2, the Master Data Fields and Result Entry Fields, you can see all of the Master and Result Data that is configured in your Campaign Template.
To delete a Field, click the bin icon to the left of the Field.
To edit a Field, click the pencil icon.
To add a new Field, click the green New button.
To read more about adding a Master Data or Result Data Field, head to the guide above.

To adjust the placement of the Data Fields in your Campaign Template, use the arrows or enter a number in the box to dictate at what point in the list the Data Field will show.
If you have a large number of Data Fields, updating the number is a quick method to change the placement, while the arrows move the Data Field one row at a time.
Click Update to save the changes.

Lead Pool Settings
Under part 3, adjust how Leads with ownership are imported into the Campaign.
- Lead Ownership Code: Check this box if you want Leads to be imported with a Lead ownership code. In the text box, enter the name of the column in the CSV file that contains the Lead Ownership Code.
- Lead Pool Priority: Check this box if you want to Lead to be imported with Lead Pool Priority. In the text box, enter the name of the column in the CSV file that contains the Lead Pool Priority.
- Private Redial Time: Check this box if you want Leads to be imported with a Private Redial Time. In the text box, enter the name of the column in the CSV file that contains the Private Redial Time.

Before you can save and continue, review your settings and make sure that each option has a green tick: if any do not, go back and adjust the settings.

Click Save to save your edits, and Next to move on to the second page of the Campaign Template Editor.

Select Main Result
Under part 1, Select Main Result, match the answers configured in the Main Outcome Picklist to the Outbound by Enreach selections by selecting the question from the drop-down menu.
In the Name column will be the outcomes you configured.
Define how the Leads will be closed by matching these to one of the four Outbound by Enreach results ( Success, Not Interested, Invalid, Unqualified).
Field Use
Under part 2, configure how the Master Data Fields and Result Data Fields will be used.
To make any changes, select or deselect the checkboxes you wish to edit.
Before you can save and continue, review your settings and make sure that each option has a green tick: if any do not, go back and adjust the settings.
To continue editing, click Save and the Next.
You can also Preview your Campaign Template, or click Previous to return to page 1 of the editor.

Field Dependencies
Under Field Dependencies, configure which Data Fields will be visible depending on what information the Agent will receive from the Lead.
Click the pencil icon to edit the Data Field, making it mandatory or invisible, or changing the dependent Data Field.
Expand the Data Field drop-down menu to select a new Data Field, and click Add to create a new Field Dependency.
For more information on how to configure Field Dependencies, head to the guide at the top of this article.
When you have finished editing you Campaign Template, click Save.
Click Previous to return to previous pages of the editor.

Rename Campaign Template
To rename an existing Campaign Template, expand the Campaigns drop-down menu and select Campaign Templates.

Locate the Campaign Template you wish to edit, click the cog icon to the right, and click Rename.

Enter the new name for your Campaign Template and click Save changes.
Please note that only an Administrator can change the name of the Campaign Template.
